WeBuild is a cloud-based construction management platform built specifically for construction workflow to help clients manage all their projects from the one place, cut admin times and make better business decisions.
WeBuild helps you to improve every aspect of running a construction business, from preparing bids with sub-contractors to managing documents, on-site field activities, project quality and safety.
We have a plan suitable for your business needs whether you’re part of a development company, construction company, specialty sub-contractor, supplier, architectural firm or engineering firm.
Our competitive plans include no upfront set-up cost, unlimited file storage, free system upgrades and free technical support for our clients and their collaborators. Clients pay only the subscription fee for the number of their internal users of the system, providing maximum flexibility to scale system usage and cost up or down to suite their changing business needs.
Who can use WeBuild?
Who can use WeBuild?
WeBuild can be used by any team of construction professionals who are involved in overseeing all or part of a project in any capacity.
WeBuild’s functionality caters to many project roles, including:
• Owners/developers
• Architects
• Designers
• Engineers
• Estimators
• Construction managers
• Project managers
• Contract administrators
• Site managers
• Sub-contractors/suppliers
Does WeBuild require any training?
Does WeBuild require any training?
Our intuitive, simple interface enables new users to learn as they click through their account. Should new users need more guidance, we provide a detailed walk-through of all our functions in our User Guide and our friendly support team is also on hand to assist you.
You can try the WeBuild Management Account functionality free of charge for 14 days by creating a new project and then starting your trial.
The difference between Collaboration account and a Management account
The difference between Collaboration account and a Management account
The answer is project control.
If your company manages project documentation, engages other companies (e.g. sub-contractors) for sub-contract work, procurement or consultancy services and oversees day to day site operations, your team will require a Management Account.
A holder of a Management Account is usually a head contractor or a developer who can upload unlimited number of projects on the system, have unlimited access to all the features we offer, and have complete control over other companies working on the project.
On the other hand, if your company is engaged to price work or provide consultancy services for a certain aspect of a project, you can connect with the project by creating a free Collaboration Account.
Create an account for your company
Create an account for your company
Welcome to Webuild! This article will teach you how to create a new company account for your organisation.
Note: If your organisation already has a WeBuild account and you would like to join your team, ask a colleague to invite you.
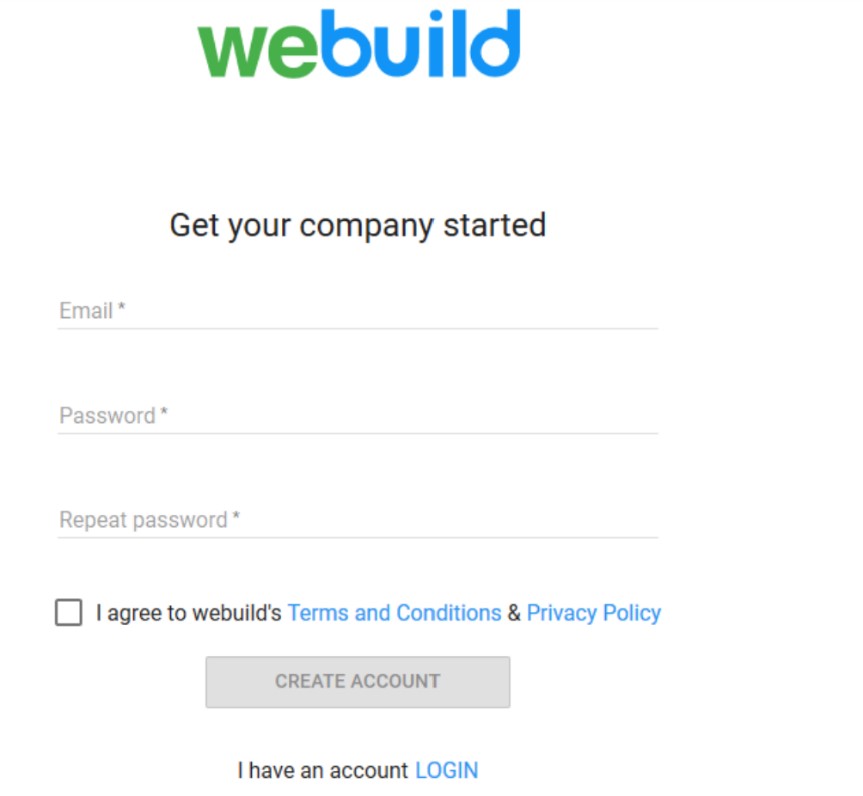
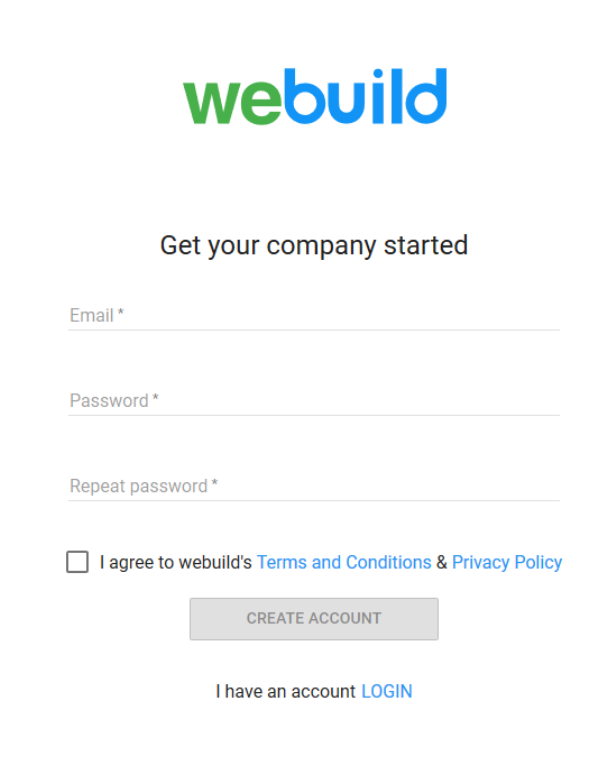
Step 1: Register your email address
To register your email address click this link, type in your email address and password and click the “CREATE ACCOUNT” button.
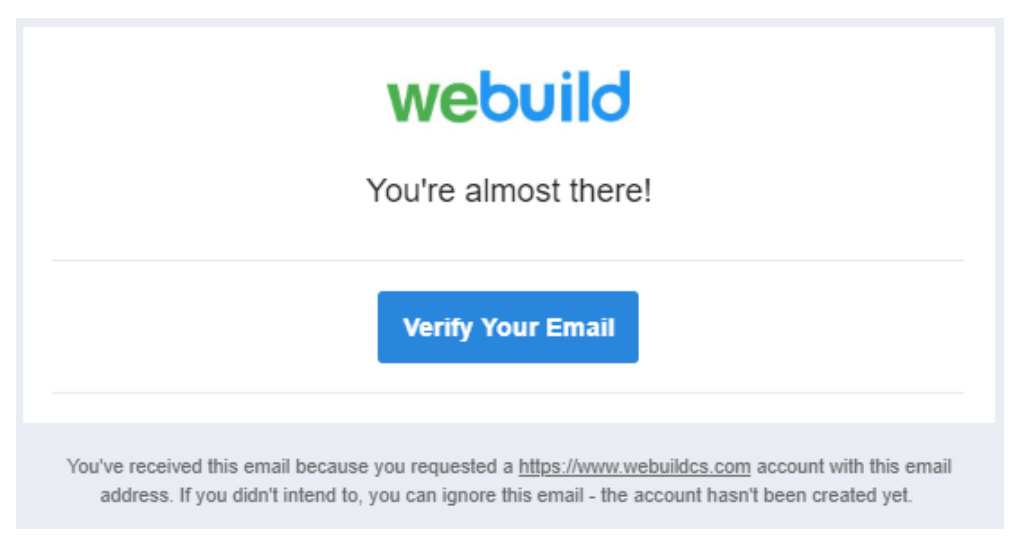
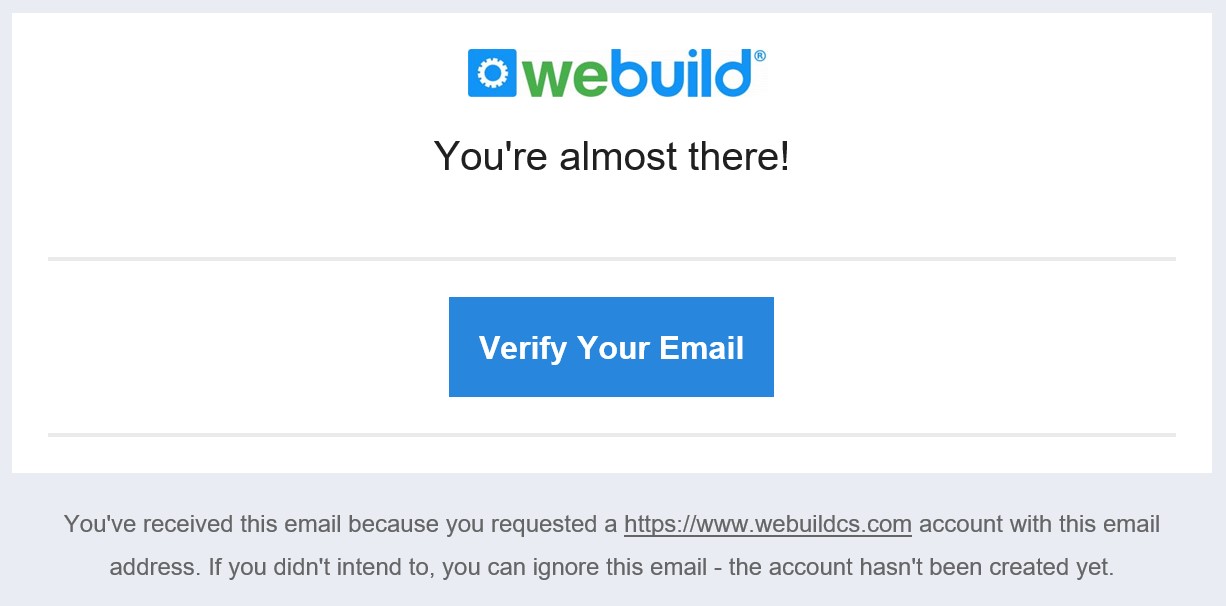
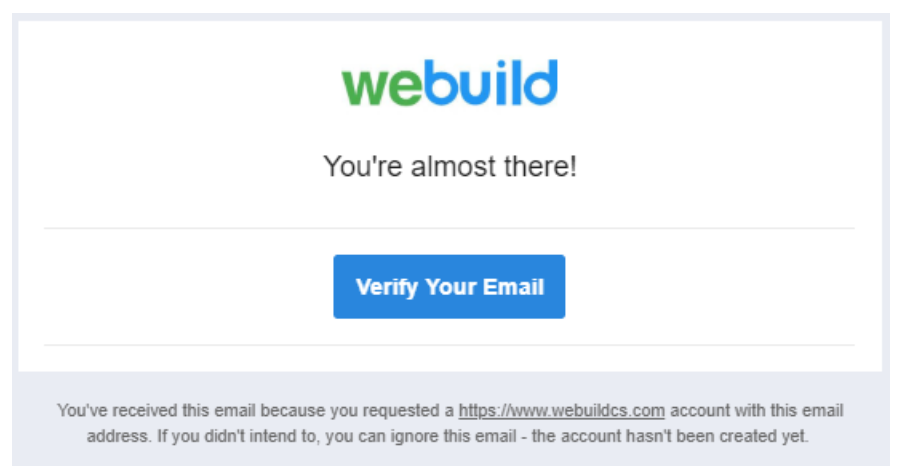
Step 2: Verify your email address
Check your inbox for an email titled “Thanks for your registration!”, open the email and click the “Verify Your Email” button. You will then be directed to the registration wizard (see Step 3).
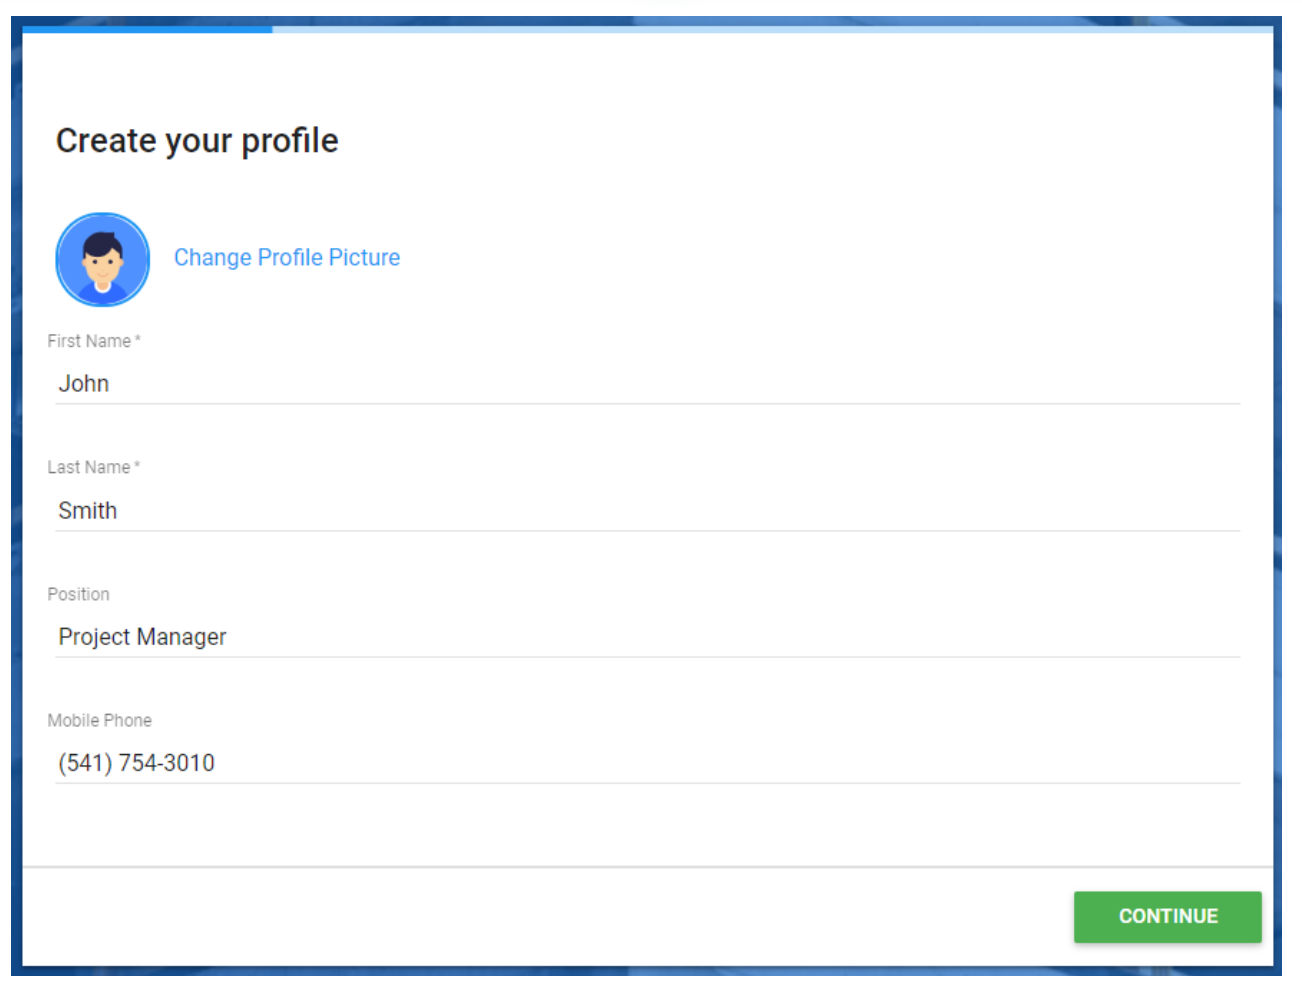
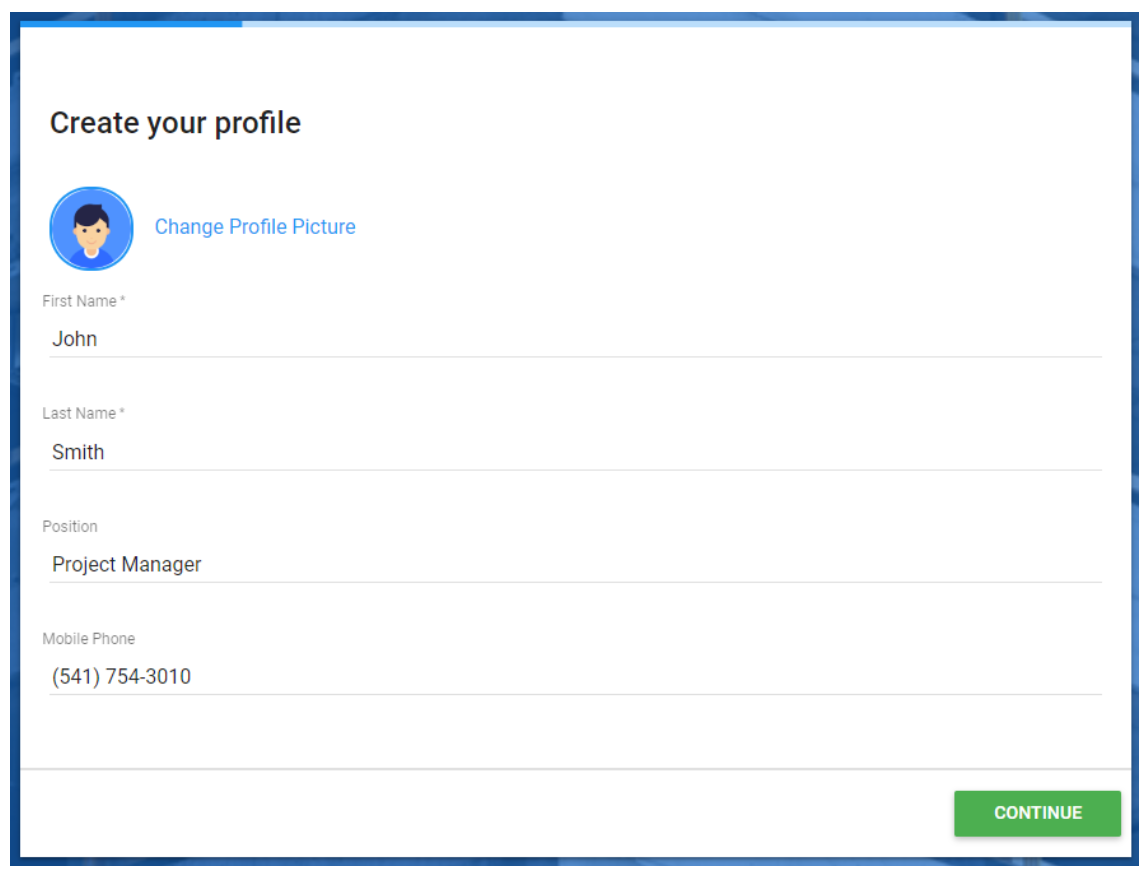
Step 3: Complete the registration wizard
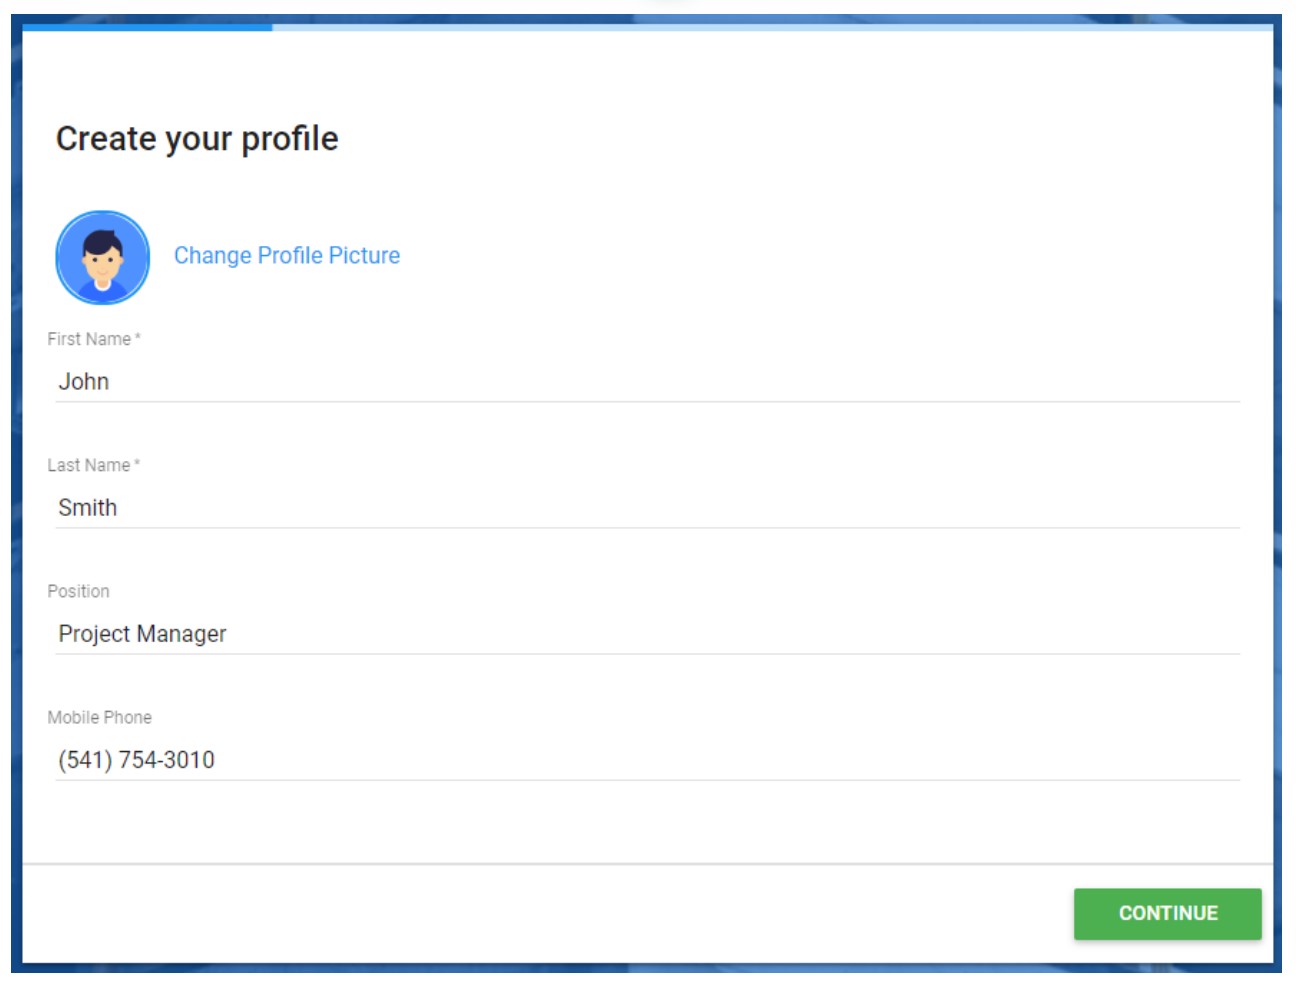
a) Start by completing your user profile, then click the “CONTINUE” button:
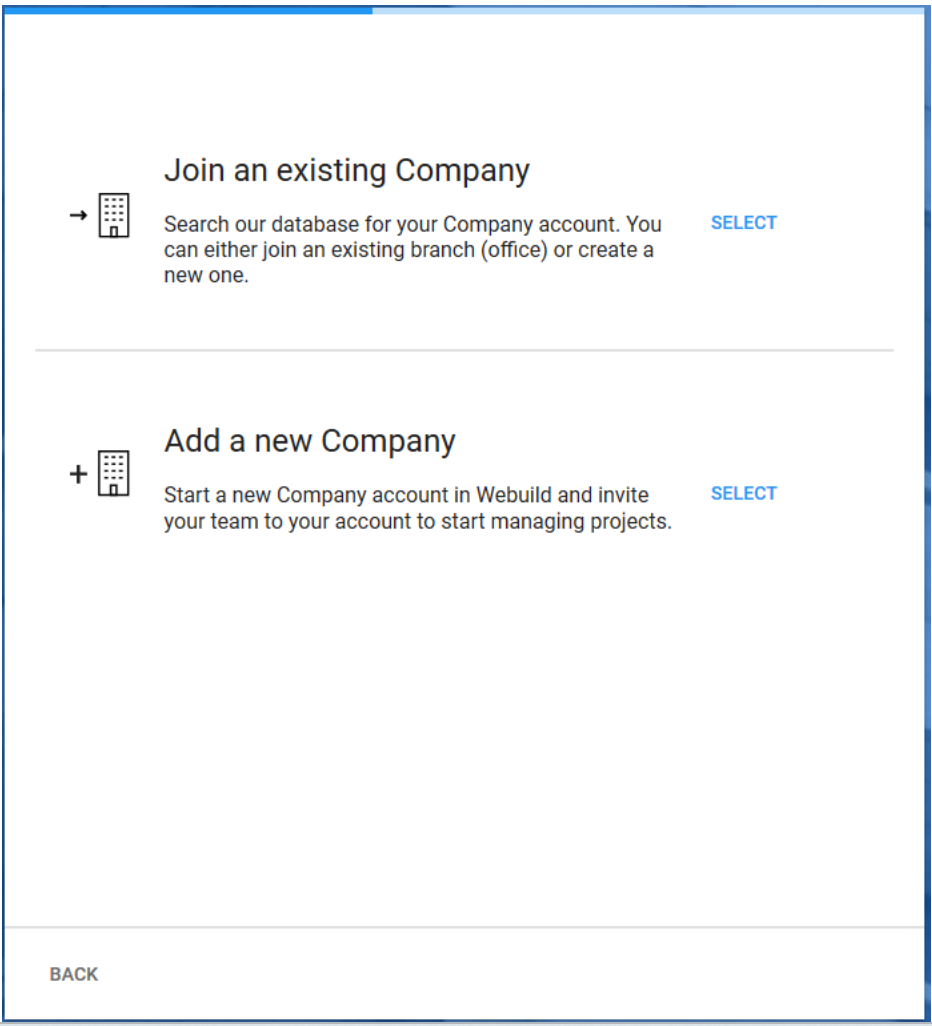
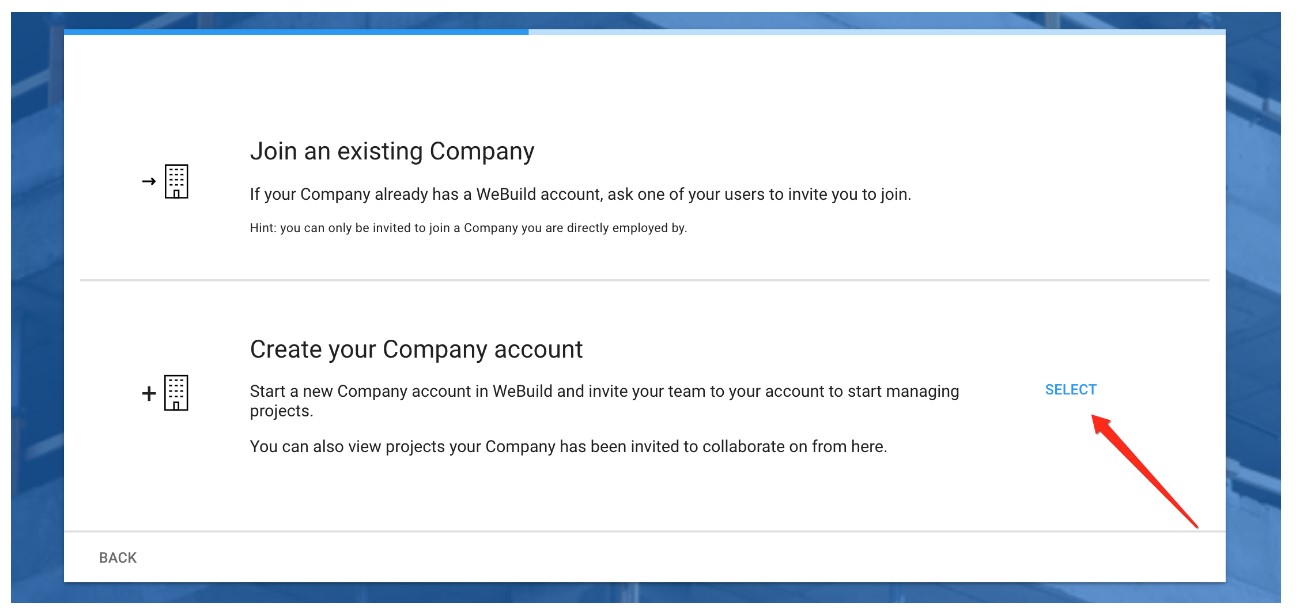
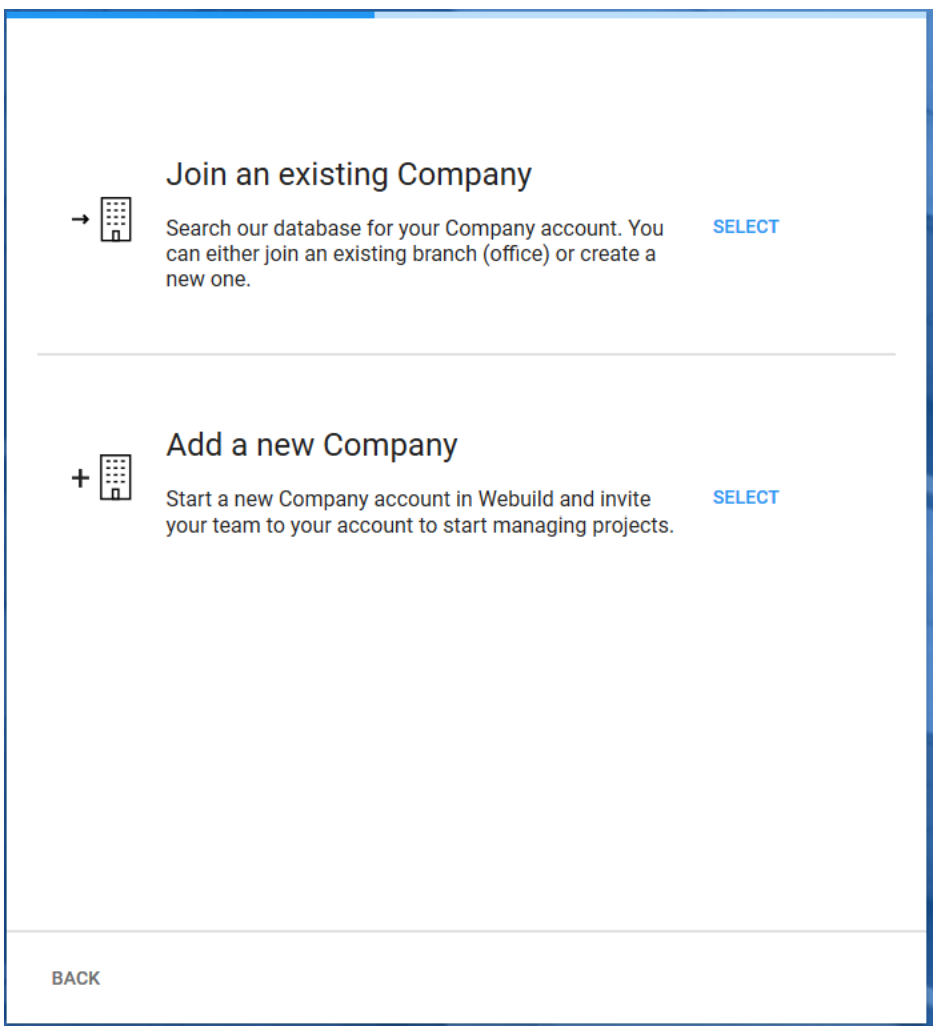
b) You can then click the “SELECT” button to the right of “Create your Company account”:
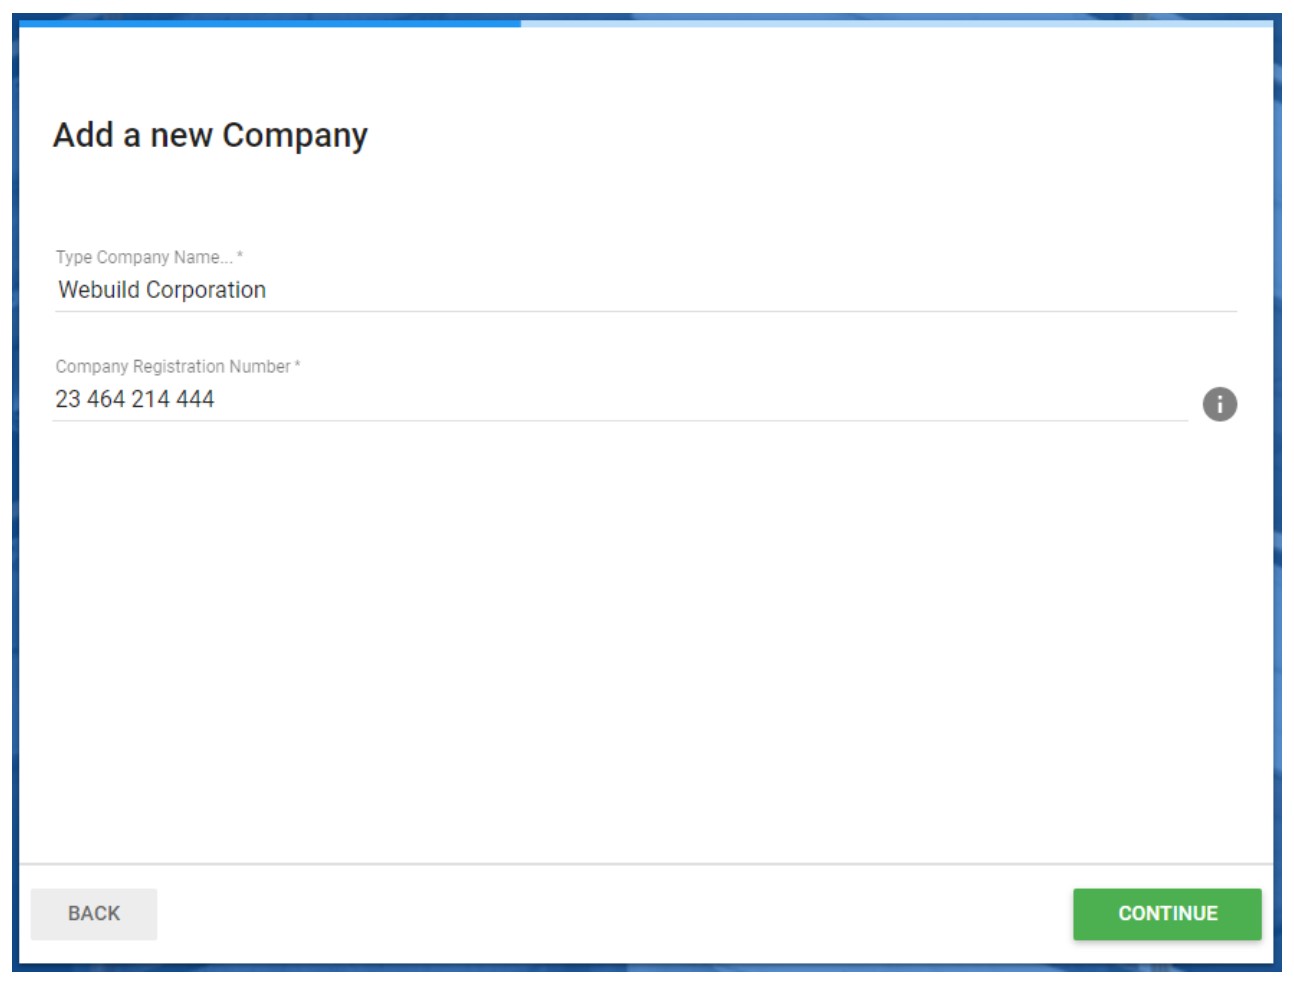
c) After typing in your Company name and Company registration number, click the “CONTINUE” button:
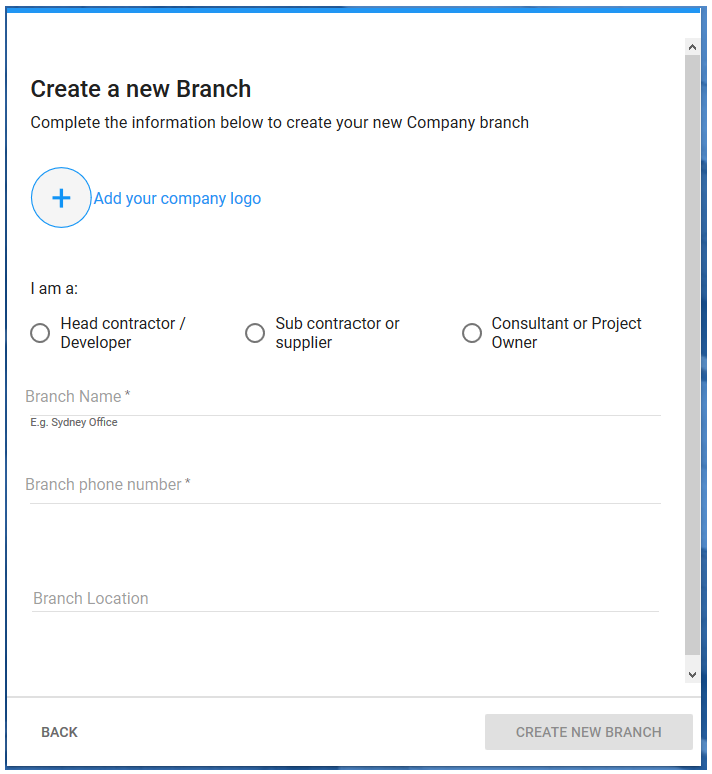
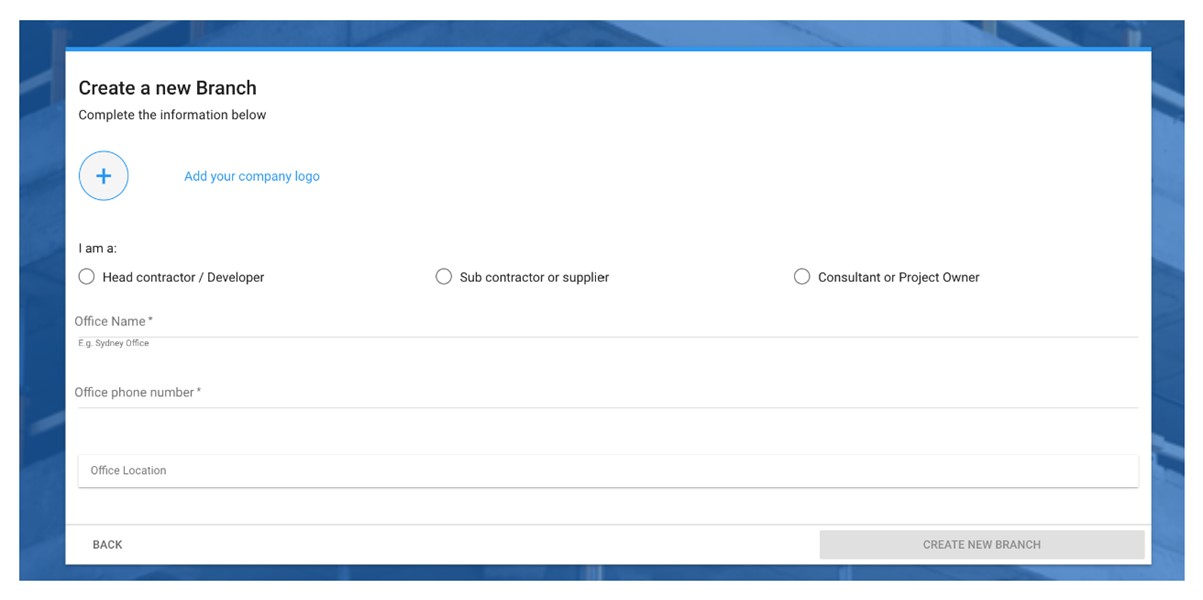
d) The final step is to complete your company branch information, including your office name (e.g. New York office), address and other information.
Click the “CREATE NEW BRANCH” button to finish creating your account.
Which branch category should I choose?
Which branch category should I choose?
Selecting a branch type helps us tailor your account to your needs. There are three branch types to choose from:
• Owners & Consultants – Your company primarily manages and consults with general contractors on a project.
• General Contractors & Developers – Your company is regularly engaged by owners to manage or oversee the management of an entire project. This includes working with consultants and managing sub-contractors and suppliers.
• Sub-contractors & Suppliers – Your company bids for work/supply associated with your specialty trade.
Create a new (separate) account for another business or branch of your company
Create a new (separate) account for another business or branch of your company
This article will teach you how to create a new (separate) branch for another business or branch of your company.
If your company has a separate business or branch and you need to create a separate account for this business or branch, you will need to go through the same steps of registering a new account the same way as if you are registering a new company.
Step 1: Register your email address
To register your email address click this link, type in your email address and password and click the “CREATE ACCOUNT” button.
You will need to use a new email address in order to create an account for the new business or branch of your company, in order for the system to log you into the correct account.
Step 2: Verify your email address
Check your inbox for an email titled “Thanks for your registration!”, open the email and click the “Verify Your Email” button. You will then be directed to the registration wizard (see Step 3).
Step 3: Complete the registration wizard
a) Start by completing your user profile, then click the “CONTINUE” button:
b) You can then click the “SELECT” button to the right of “Create your Company account”:
c) After typing in your Company name and Company registration number, click the “CONTINUE” button:
d) The final step is to complete the new business or branch information. It is important to include a different Office Name (e.g. New York office) for this business or branch as well as address and other information to distinguish the account of this business or branch from the other accounts of your company.
Click the “CREATE NEW BRANCH” button to finish creating your account.
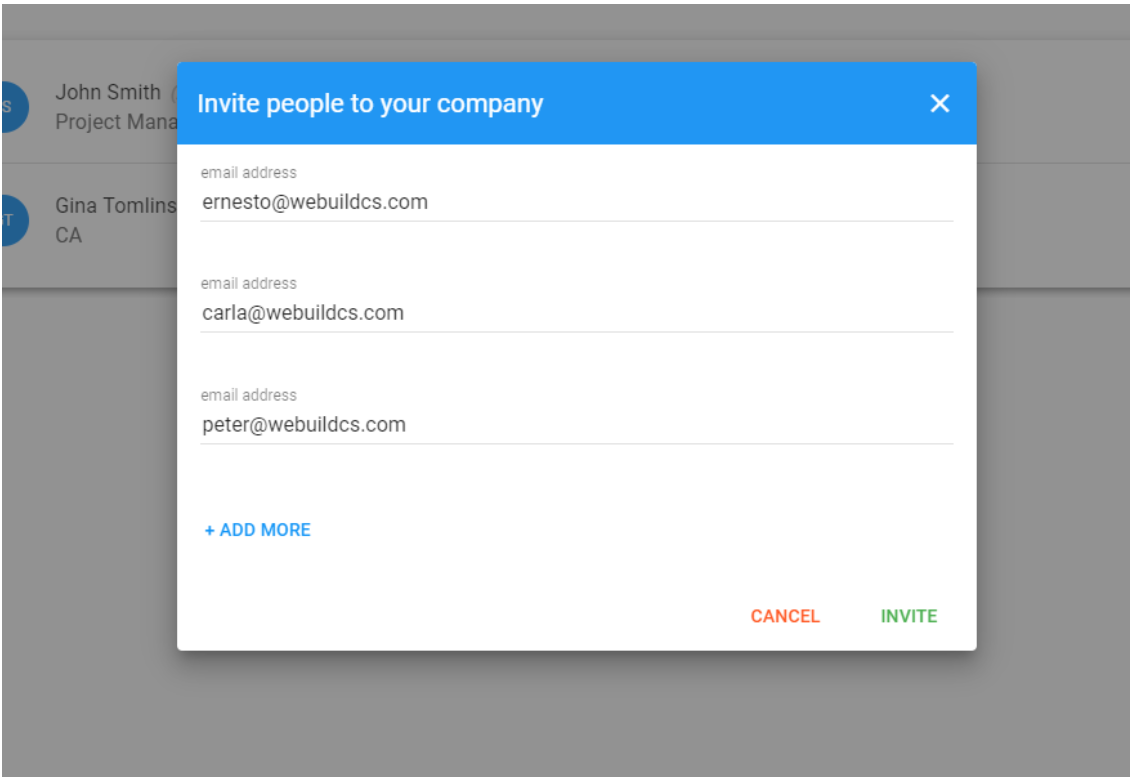
Add team members to your company account
Add team members to your company account
To invite team members to your organisation, login to your Webuild account and follow the below steps.
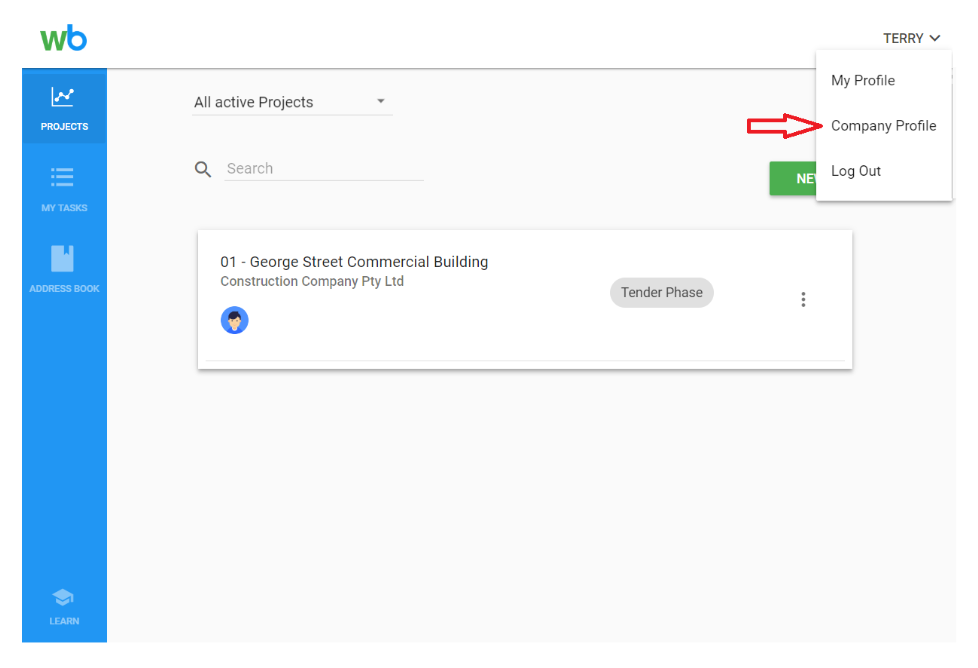
Step 1: Go to your company profile
After you log in to your Webuild account, you can access your company profile by clicking your name on the top right-hand side of your screen.
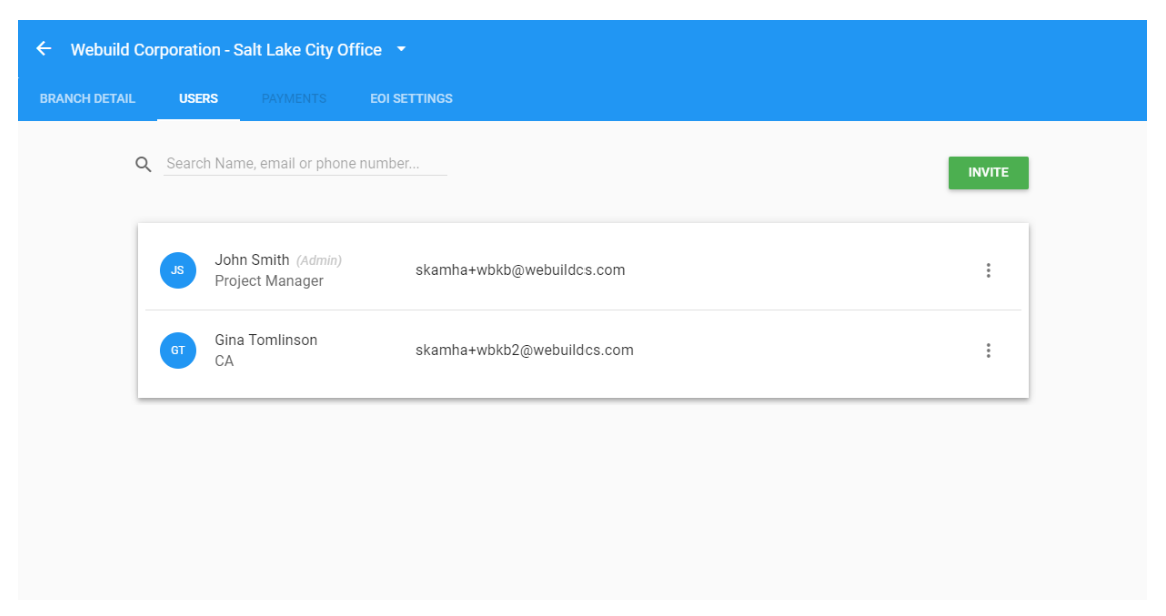
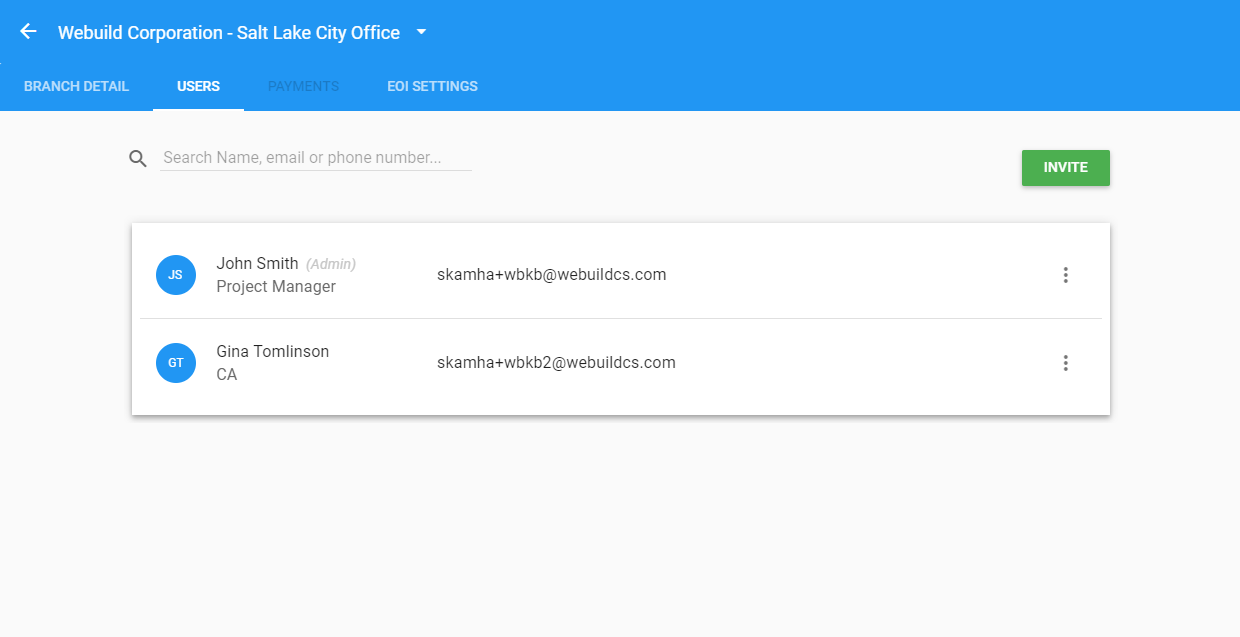
Step 2: Click the user’s tab
Once you have navigated to your company profile, select the Users tab and click the INVITE button to invite team members to join your account.
Step 3: Invite team members
Type in the email addresses of team members you would like to invite to join your company branch, then click the INVITE button.
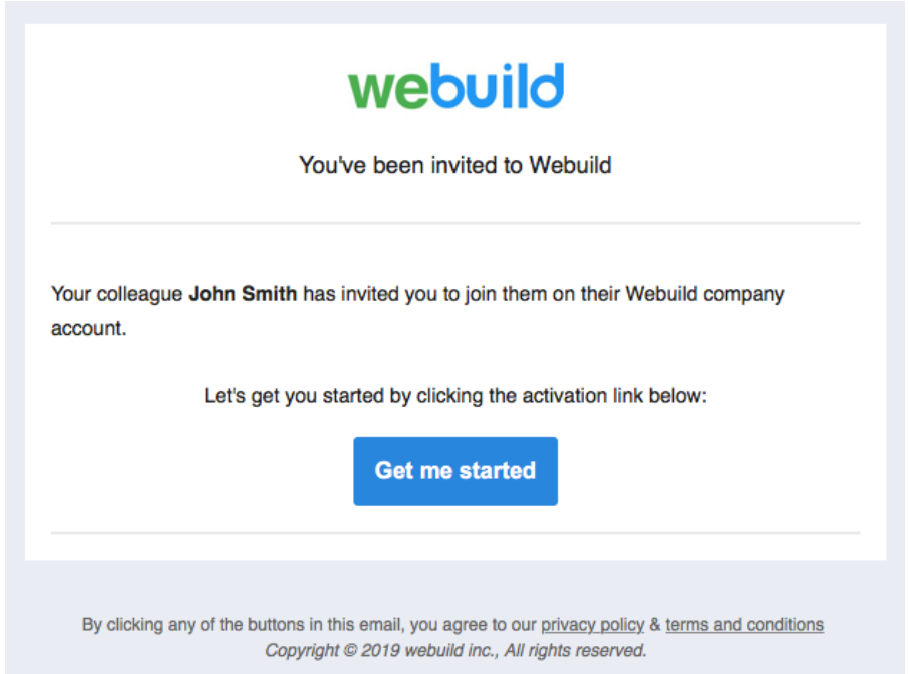
Step 4: Email to invited team members
Invited team members will receive an email notification.
After clicking the “Get me started” button, team members will be directed to a one-step wizard to confirm some information and add their password.
Once this is done, team members will have access to their account and start working on projects.
Join your (existing) company account
Join your (existing) company account
This article will show you how to join your team in your organisation’s Webuild account.
Tip: A quicker way to join your team on Webuild is to ask a colleague to invite you to join via the Users tab in the Company profile section.
Step 1: Register your email address
To register your email address click this link, type in your email address and password and click the CREATE ACCOUNT button.
Step 2: Verify your email address
Check your inbox for an email titled “Thanks for your registration!”, open the email and click the “Verify Your Email” button. You will then be directed to the registration wizard (see Step 3).
Step 3: Complete the registration wizard
a) Start by completing your user profile, then click the CONTINUE button:
b) You can then click the SELECT button to the right of “Join an existing Company”:
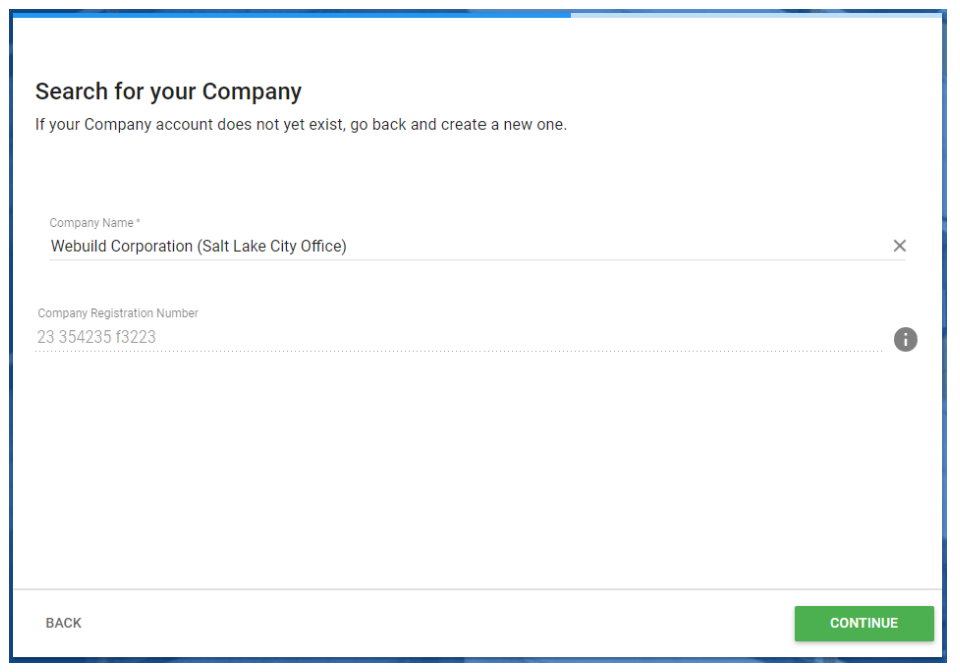
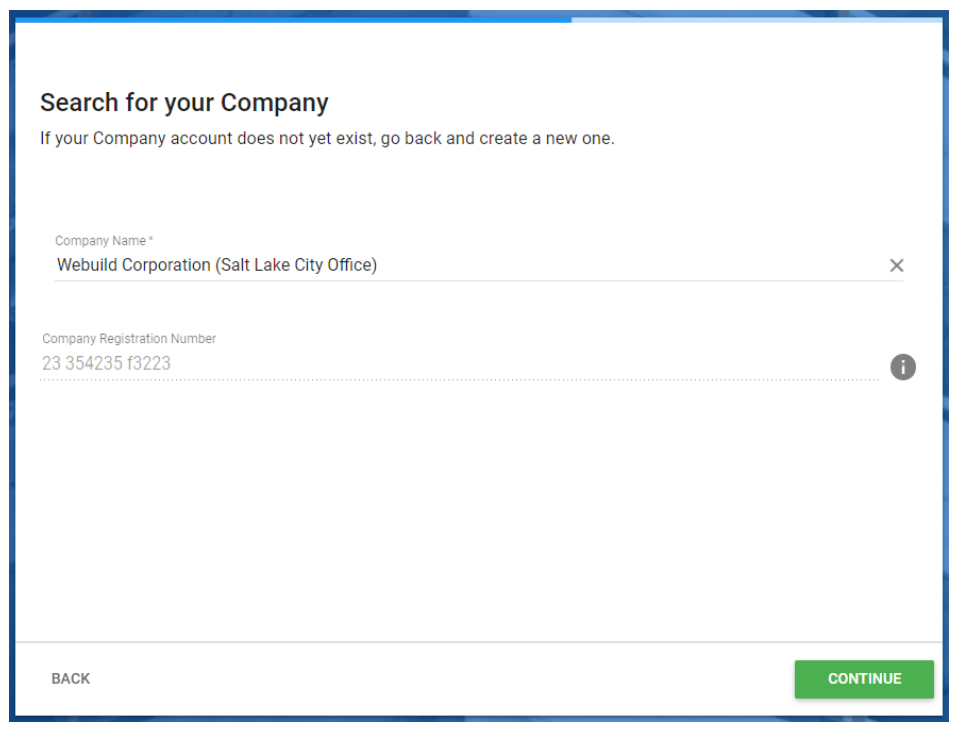
c) Click on the “Company name” field, type your Company’s name. After selecting your company from the list of search results, click the CONTINUE button:
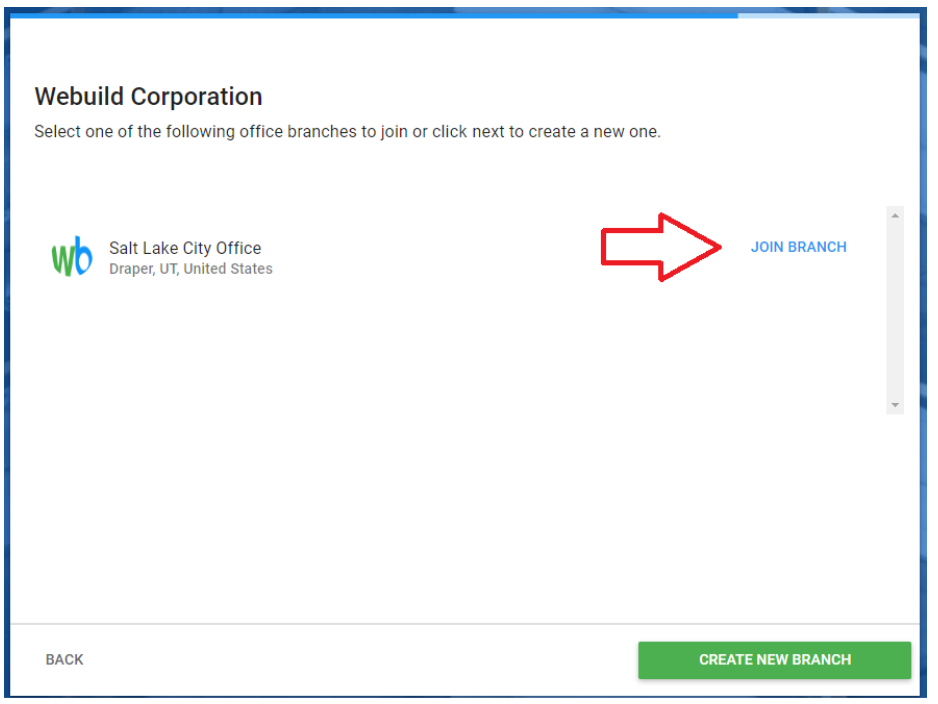
d) The final step is to select the company branch you would like to join by clicking the “JOIN BRANCH” button (located to the right of the listed branch):
Note: If you would like to create an account for another office in a different location, click the CREATE NEW BRANCH button on the bottom right of the dialog.
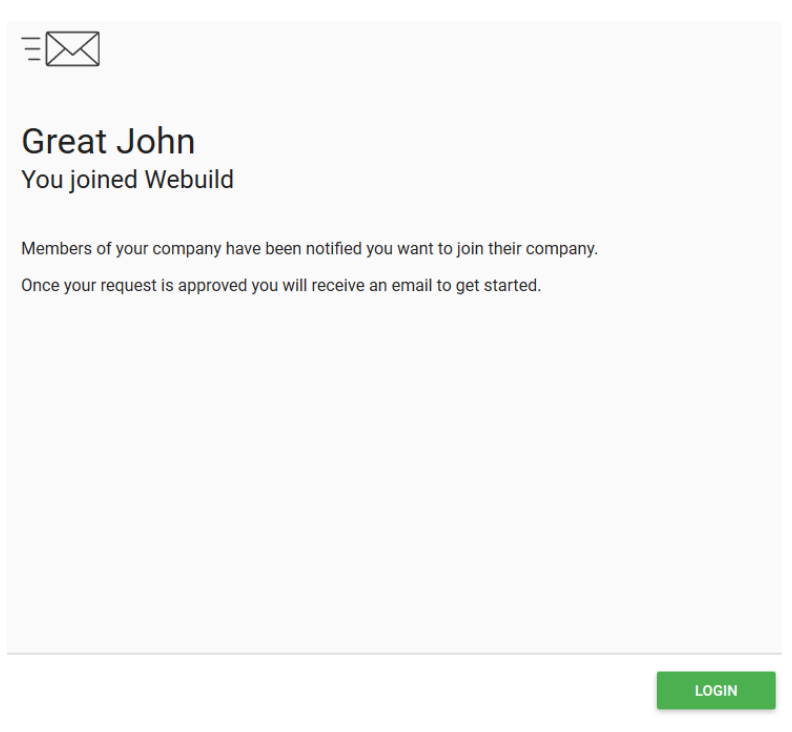
e) Members of your team will be notified of your request to join via email. Once you are approved to join the team, you will be notified and can then get started with your account.
Assign admin rights to team members
Assign admin rights to team members
Admin users can:
Edit company name and branch information
Remove other users
Give admin rights to other users
To assign admin rights to team members in your account, follow the below steps.
Step 1: Go to your company profile
After you log in to your Webuild account, you can access your company profile by clicking your name on the top-right hand side of your screen
Step 2: Click the users tab
Once you have navigated to your company profile, select the USERS tab and click the INVITE button to invite team members to join your account.
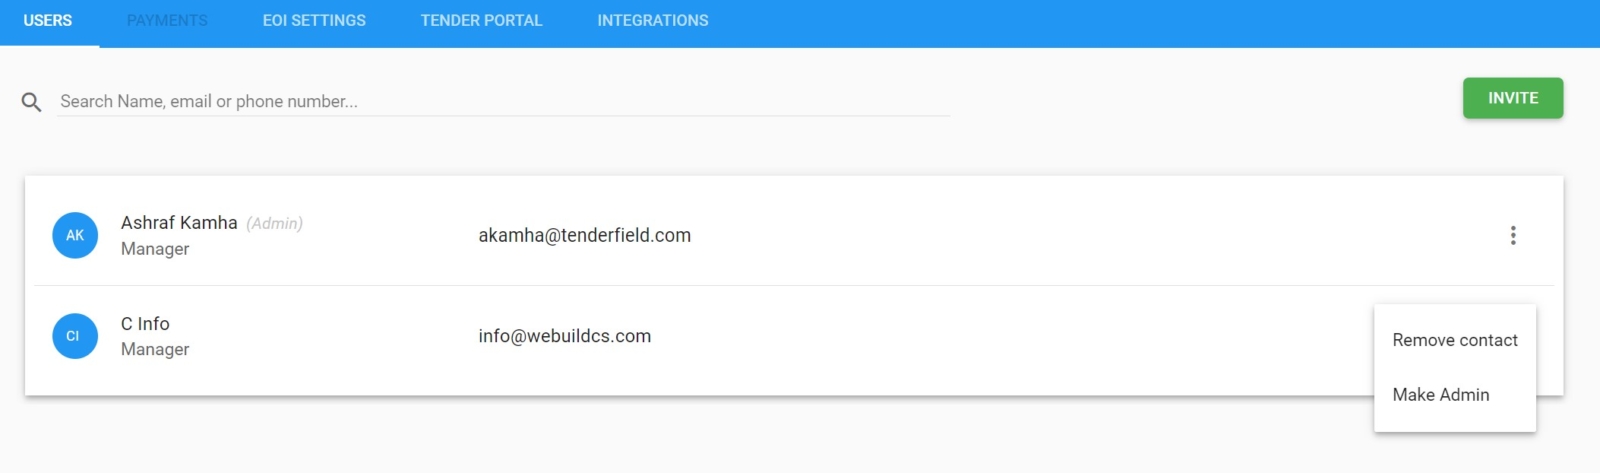
Step 3: Click the overflow button
Click the small button on the right-hand side of the related user and select “Make Admin” from the menu.
Remove a team member from your company account
Remove a team member from your company account
To remove a team member from your account, follow the below steps.
Step 1: Go to your company profile
After you log in to your Webuild account, you can access your company profile by clicking your name on the top-right hand side of your screen
Step 2: Click the users tab
Once you have navigated to your company profile, select the “USERS” tab and click the “INVITE” button to invite team members to join your account.
Step 3: Click the overflow button
Click the small button on the right-hand side of the related user and select “Remove contact” from the menu.
Step 4: Re-assign work to another team member
It is possible that the user being removed is associated with project tasks and correspondence with external parties.
Before removing the user, you can re-assign all the responsibilities of that person on one or all related projects to another team member.
Once you have assigned all project responsibilities, click the “REMOVE AND TRANSFER” button.
Create a project
Create a project
Now that you have created your Webuild account, added your team members and imported contacts into your organisation’s address book, you are ready to create your first project.
This article will teach you how to create a project with your Webuild account.
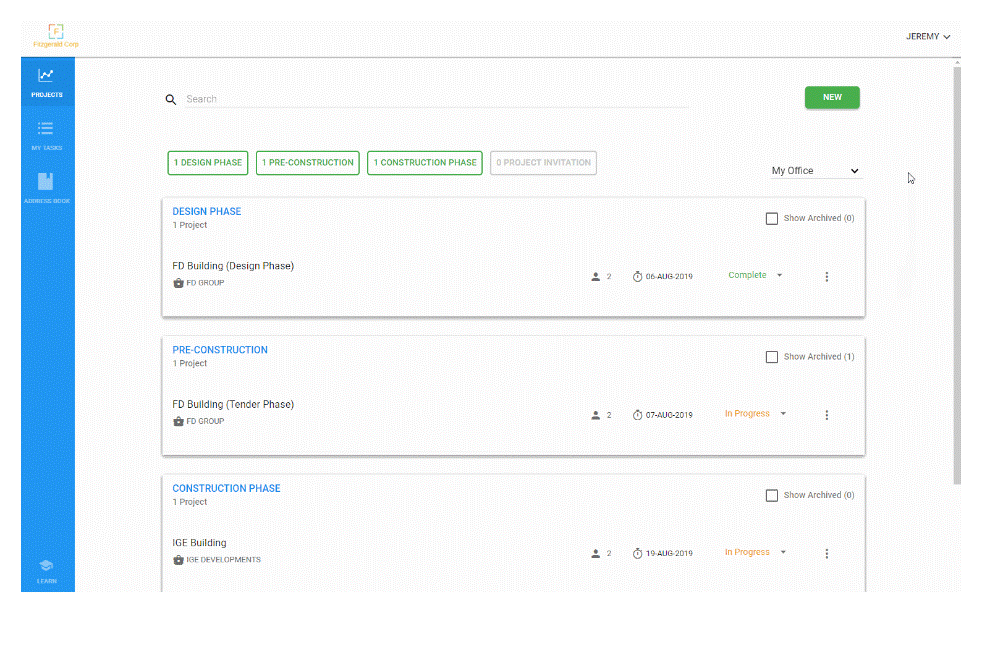
Step 1: Log in to your account and click CREATE PROJECT
After logging in to your account, your “Projects” area will be displayed. Click the “NEW” button to start the create project wizard.
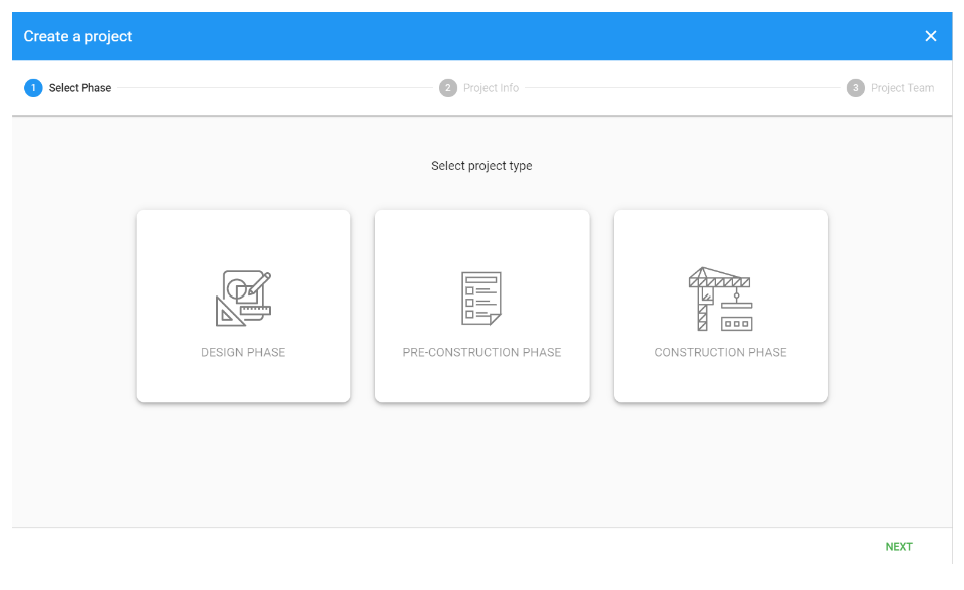
Step 2: Select your project type
In the first step of the create project wizard, you have the option to select either the “Design”, “Pre-construction” or “Construction” phase project type.
To learn about the differences between project types and the handover process, go to Project Admin section.
After selecting your project type, click the “NEXT” button.
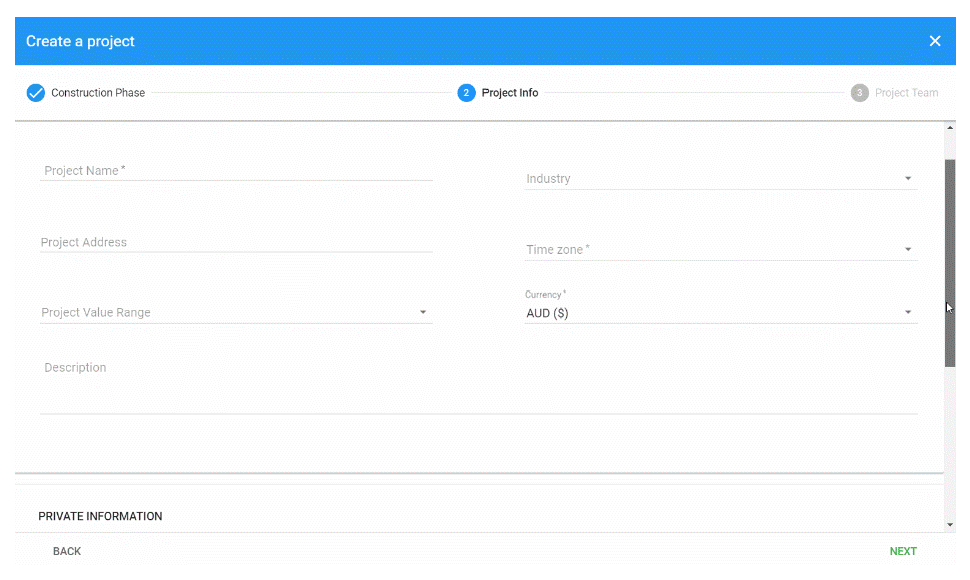
Step 3: Add your project information
Complete your project information, then click the “NEXT” button.
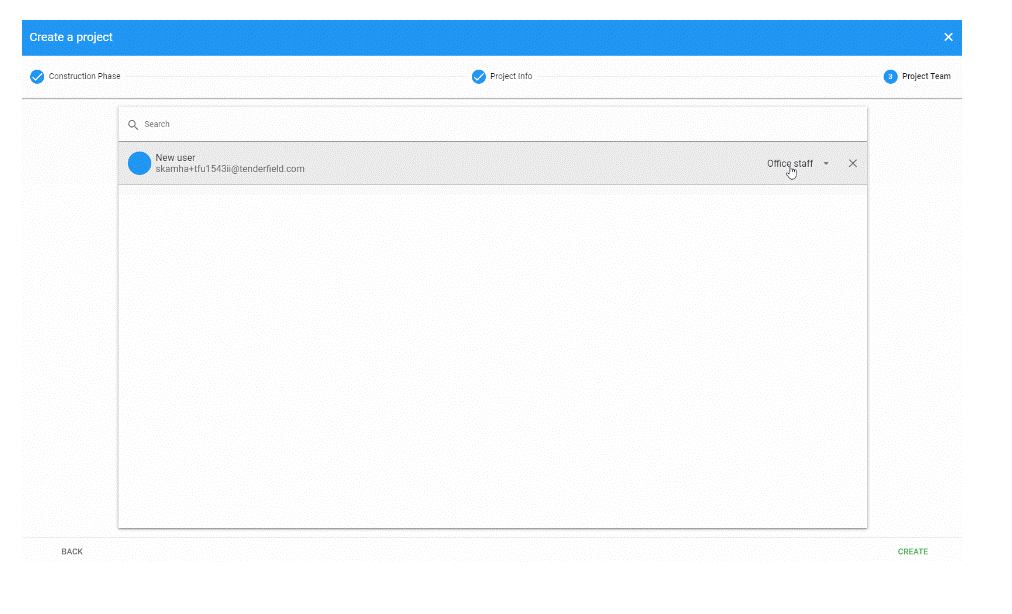
Step 4: Add your project team and manage permissions
To add team members to your project, click the search field and select the team members you wish to add.
You can also invite new team members to join your organisation (and project) by clicking the search field and selecting the “ADD TEAM MEMBER” button.
After adding colleagues to your project team list, select their related permissions by clicking the menu to the right of their name and selecting either “Office staff” or “Site staff”.
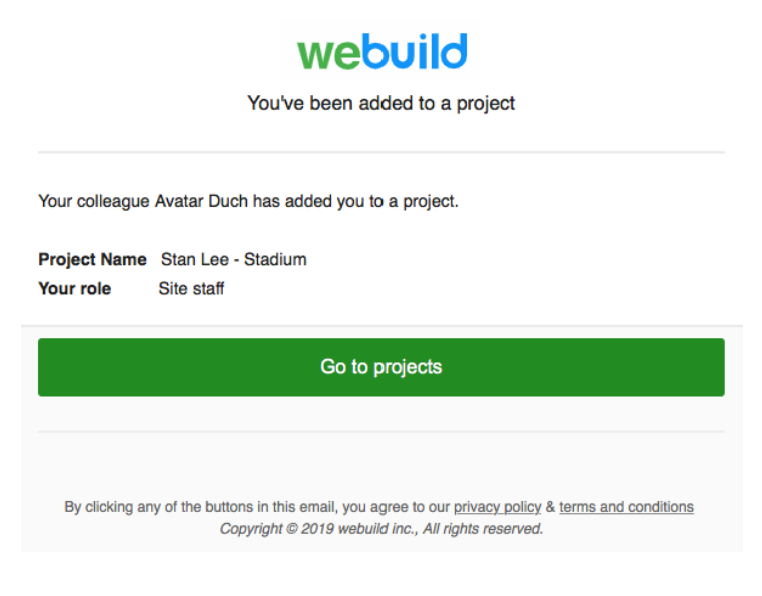
Step 5: Create a project and send notifications
After adding your team members, click the “CREATE” button to finish creating your project.
Any added team members will receive an email notification like the one below, with a button directing them to your project.
Building Information Modelling, commonly known as BIM, has taken off over the past few years as more building designers and construction project managers have come to recognise its benefits.
https://www.webuildcs.com/wp-content/uploads/BIM_blog_thumbnail_v2-2.png7491123WeBuildhttps://www.webuildcs.com/wp-content/uploads/webuild-logo-R.pngWeBuild2023-02-06 05:08:082023-07-23 10:02:25A beginner’s guide to Building Information Modelling (BIM)
Construction sites are a dangerous place to work. There are always hazards that arise and continually change throughout the construction process. The fact is that safety management is the responsibility of everyone on the site, however, there are many sites that don’t have an adequate Work Health & Safety (WHS) plan in place when something does go wrong.
https://www.webuildcs.com/wp-content/uploads/CAMPING-WALKTHROUGHS-NO.-6.png315560WeBuildhttps://www.webuildcs.com/wp-content/uploads/webuild-logo-R.pngWeBuild2023-01-30 12:48:002023-07-23 10:11:58A guide to implementing a construction safety management plan
As competition intensifies and profit margins come under pressure, construction firms are continuously looking for ways to enhance project productivity and avoid cost and schedule overruns. Numerous approaches have been tried, including technical improvements in construction processes, new building materials and the use of technology to streamline project management.